
Build monday agents with Make
Connect your make agent to monday.com and power it using monday AI using 4 new AI modules.
As part of the Bring Your Own Agent integration with Make, there are four new modules for Make.com.
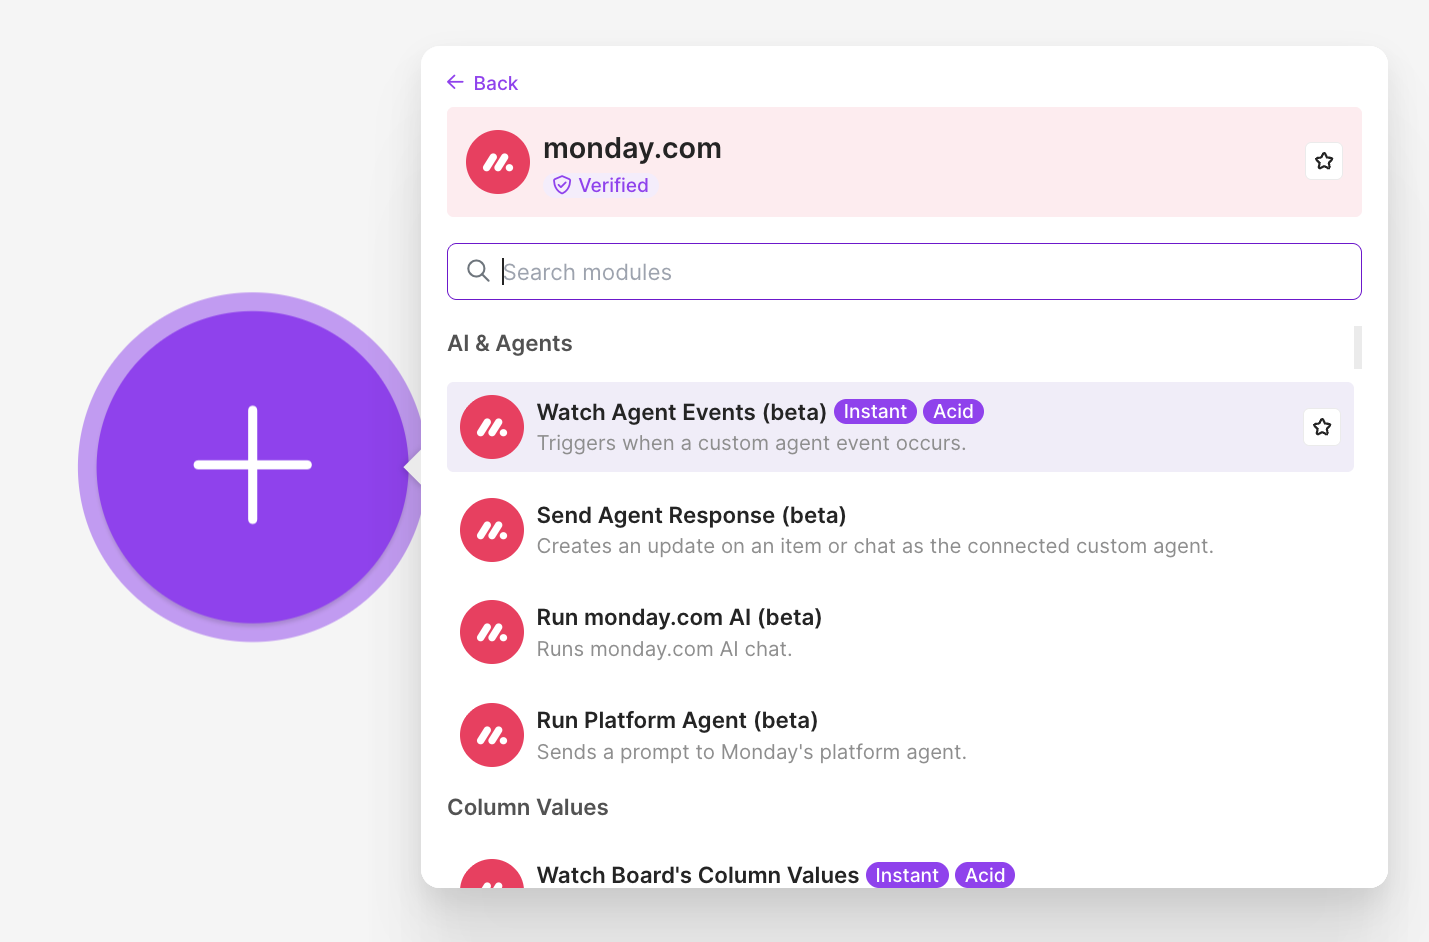
Agent modules (for building agents)
- Watch Agent Events (beta): an instant trigger that fires whenever your agent is triggered in monday.com.
- Send Agent Response (beta): sends a reply back as the agent, on an item or in a chat.
monday.com AI modules (for powering agents with monday AI)
- Run monday.com AI (beta): run LLM calls to multiple providers through monday.com.
- Run Platform Agent (beta): an agent that can take any actions on monday.com.
This guide covers the agent modules and the starter template that ties them together. The brain of the agent is up to you: the template uses the Make AI Agent, and you can swap in the monday.com AI modules or any other logic.
How it works
- You create an agent in monday.com (Agents → Bring your own agent → Make) and copy its API key.
- You open the Monday Agent template in Make. Watch Agent Events uses the API key as its connection. When you save the module, it creates a webhook and attaches it to your agent. The agent now shows a scenario attached to it in monday.com.
- Every time someone triggers the agent, the webhook fires and your scenario runs. There are three ways to trigger an agent:
- Chat: someone messages the agent.
- Mention: someone @mentions the agent in an update on an item. The agent appears in the mention list like a user and receives the context of the item.
- Assign: someone assigns the agent on an item, for example in a column.
- A router splits the flow by event type, and your scenario decides what to do.
- To reply, Send Agent Response takes the response you want to send, plus the conversation ID from the webhook payload when replying in a chat. Replies are posted on behalf of the agent.
One webhook per agentA monday.com agent supports one webhook at a time. Creating a new webhook for the same agent replaces the previous one, and the old webhook stops receiving events.
Setup
1. Create the agent in monday.com
- In monday.com, go to Agents → Bring your own agent and select Make.
- Give the agent a name and create it.
- Copy the agent's API key. You'll use it as the connection in Make. (External Agent Setup Guide)
The agent exists, but it has no logic yet. The next step attaches a Make scenario to it.
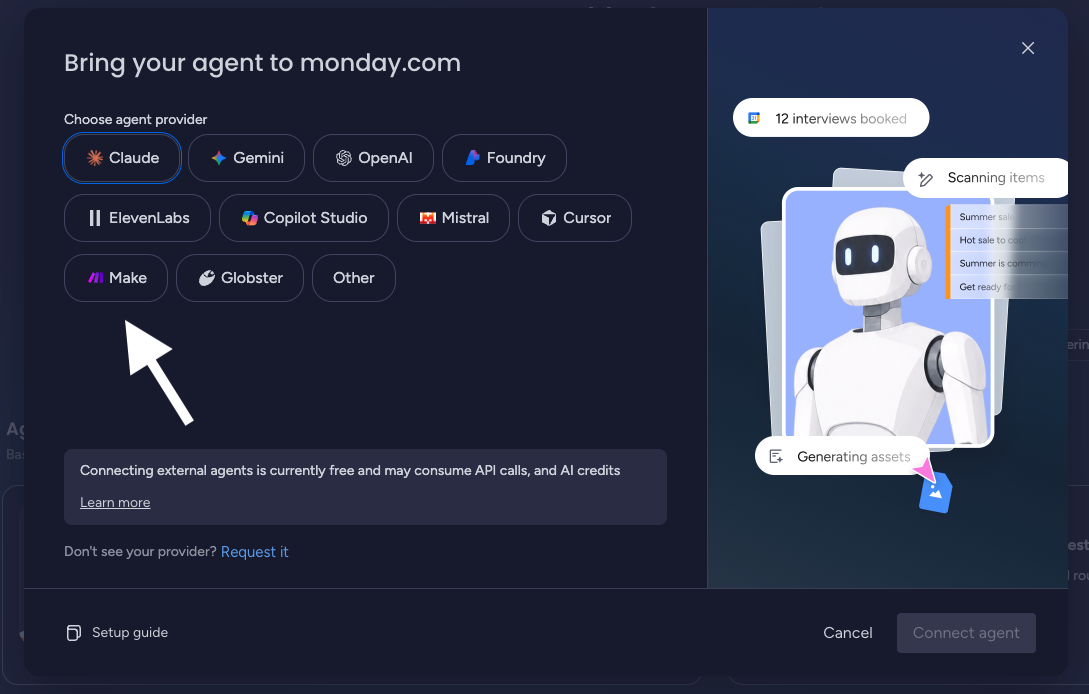
2. Start from the template
From the same screen in monday.com, open the Monday Agent template. This opens Make, where you can click Start guided setup or Create new scenario from template.
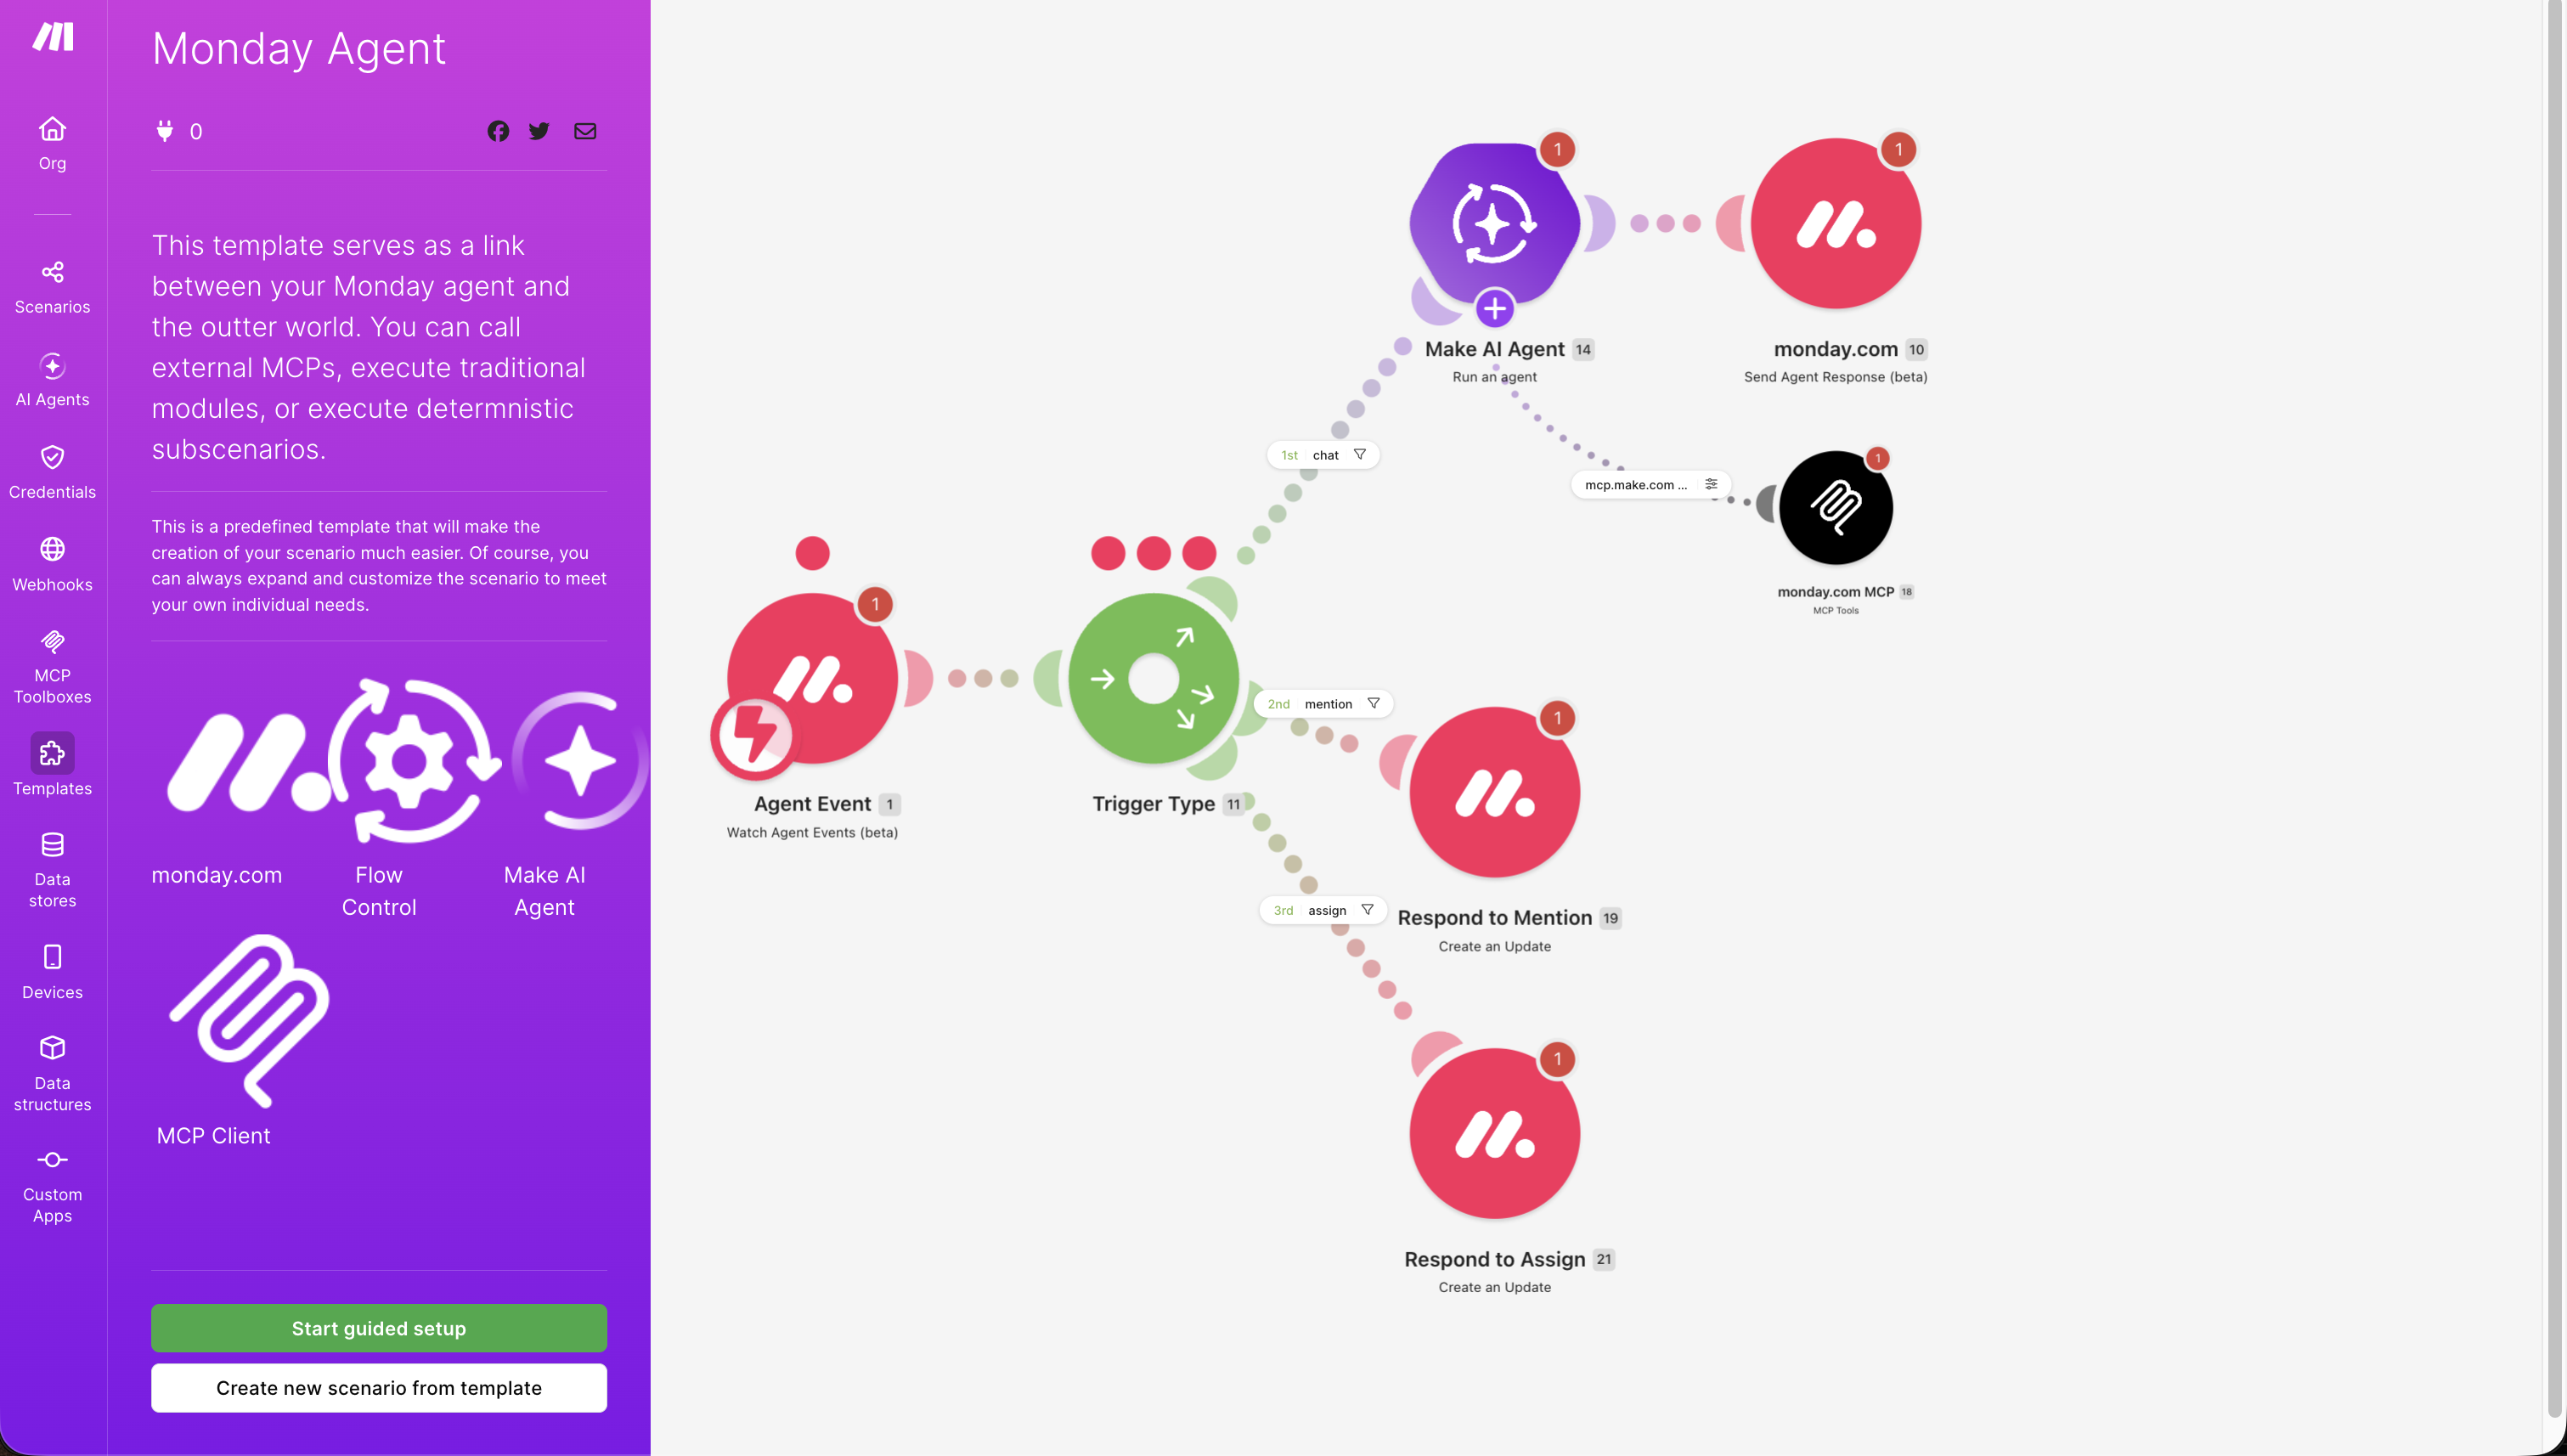
The scenario comes with the agent already laid out:
- Agent Event (Watch Agent Events): the trigger
- Trigger Type (Router): splits the flow by event type
- chat → Make AI Agent → Send Agent Response. The AI agent can also call external tools through the monday.com MCP.
- mention → Respond to Mention (Create an Update)
- assign → Respond to Assign (Create an Update)
Out of the box, the mention and assign branches reply with a placeholder message ("I was not yet configured…"). They are there so you can see the agent respond end to end, then replace them with your own logic.
3. Connect the trigger and create the webhook
- Open the Watch Agent Events module and click Add next to the connection.
- Paste the agent's API key to create a new connection.
- Save the module. The webhook is created and attached to your agent automatically.
The core of your agent is now set up. Back in monday.com, the agent shows the scenario as attached, and you can open it from there.
4. Understand the three event branches
- Assign: runs when the agent is assigned, for example through a column on an item. In the template it responds with an update on the item.
- Mention: runs when the agent is @mentioned on an item. In the template it responds with an update on the item. To keep the conversation in one place, map the update you are replying to so the response lands in the same thread.
- Chat: runs when someone messages the agent. This is the main flow, where the agent does its work.
5. Set up the AI agent and the monday.com MCP
The chat branch uses the Make AI Agent. You can use any workflow or AI logic you want here, including the monday.com AI modules.
To let the agent read and write monday.com data, add the monday.com MCP to it:
- In the Make AI Agent, add an MCP tool and choose New MCP server.
- Set the URL to
https://mcp.monday.com/mcp. - Use the same connection you created for your agent (the agent's API key).
All of the monday.com MCP tools are now available to the agent through this connection, and any use of the MCP goes through the agent. This is what lets the agent read, write, and take actions on your boards.
Conversation memoryThe Make AI Agent maintains the conversation session. When someone asks a follow-up question in the chat, the agent has the conversation history and knows the context.
Optionally, give the agent instructions that tell it what it is responsible for. For example, point it at a specific board and include the board ID. This noticeably improves its answers when it is asked about that board.
6. Update the remaining connections
The template's other monday.com modules (Send Agent Response, Respond to Mention, Respond to Assign) need to use your agent's connection too. Open each one and select the connection you created. Do the same for the Make AI Agent and MCP connections.
7. Map the response
In Send Agent Response, map:
- Conversation ID: from the Watch Agent Events output
- Response: the message you want the agent to send (for example, the output of the Make AI Agent)
8. Test it
Run the scenario (or turn it on) and trigger your agent in monday.com:
- Chat: open the agent's chat and send a message. If the agent needs more detail, it asks, and you can reply in the same chat. Run the scenario again for the next message while testing.
- Mention: @mention the agent in an update on an item. The agent triggers with the context of the item, and its reply appears in the update, posted as the agent.
- Assign: assign the agent on an item.
You should see the scenario run in Make and the response appear in monday.com.
Extending your agent
The template is a starting point. Replace the placeholder replies with your own tools and workflows. You can:
- Call external MCP servers
- Run traditional Make modules
- Trigger deterministic sub-scenarios
- Power the agent with Run monday.com AI or Run Platform Agent instead of (or alongside) the Make AI Agent
Once the template is updated with your tools and workflows, you have a monday.com agent that people can chat with, mention, and assign, backed by a Make scenario.
Updated about 1 hour ago