Dynamic mapping fields
Technical reference to map data from monday into another platform (or vice versa).
This app feature will be deprecated soon. We recommend building on the monday workflows infrastructure. Learn more about the migration here.
Use dynamic mapping if you need to map data from monday.com to fields in another platform.
Concepts
What is item mapping?
Many native integrations in monday.com let you map data from items and columns to objects in other platforms. Item mapping allows you to use this same functionality in your app’s integration recipes.
For an example, take this recipe from our Github integration, “When an issue is created in repository, create an item”:
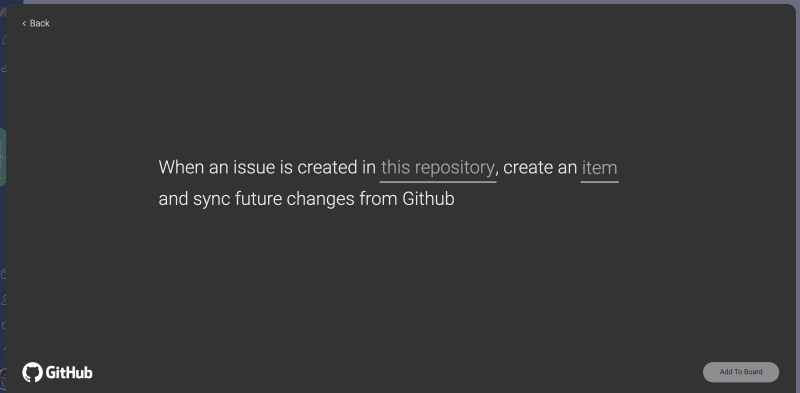
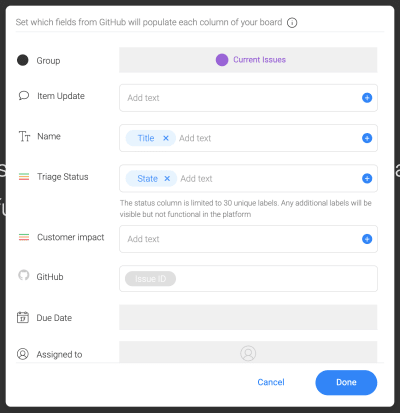
The user can map data from the entity in the other platform (Github issue) that is created into the item on monday.com:
When should I use dynamic mapping?
You should use dynamic mapping with custom entities if:
- You need to send data in monday.com to an outside source.
- Your integration updates monday.com from changes in an object from another platform (or vice versa).
Entity schema
The entity schema defines what fields the object contains and are available for mapping. You can reuse your custom entity in multiple recipes and blocks.
The schema defines the fields, their types, and any dependencies required.
Reference
Field Definitions URL
The Field Definitions URL is an endpoint on your app server that will return the schema available for a given entity. When a user clicks the entity name in a recipe, the monday apps server will retrieve the entity’s fields from a remote endpoint.
Dependencies
Dependencies are parts of the recipe that a user must configure before they use the mapping. You can use any field (in-built or custom) as a dependency, and they will be passed to your remote options URL.
Request Body
The body of the request will look like this:
{
    "payload" : {
        "boardId" : 162169280, // boardId is a dependency
        "side" : "source" // or "target"
    }
}
Response Format
Your server should return a status code 200 and an array of fields, which can be static or dynamically generated based on the dependencies. Each field should be a JSON object with the following key-value pairs:
| Key | Description | Type |
|---|---|---|
| id | The ID/key that the data will be passed with | string |
| title | Label displayed to the user | string |
| outboundType | The primitive type of this field when it’s sent | string, must match one of the supported primitive types |
| inboundTypes | The primitive types that this field accepts | Array of strings |
Example Code
Here's a simple NodeJS implementation of the Field Definitions URL. This schema contains 5 fields.
async function getRemoteFieldDefs(req, res) {
  return res.status(200).send([
    { id: 'name', title: 'Name', outboundType: 'text', inboundTypes: ['text'] },
    { id: 'desc', title: 'Description', outboundType: 'text', inboundTypes: ['empty_value', 'text', 'text_array'] },
    { id: 'dueDate', title: 'Due Date', outboundType: 'date', inboundTypes: ['empty_value', 'date', 'date_time'] },
    { id: 'people', title: 'People', outboundType: 'user_emails', inboundTypes: 'user_emails' },
    { id: 'creationDate', title: 'CreateDate', outboundType: 'date_time', inboundTypes: ['date', 'date_time'] },
  ]);
}
Supported Primitive Field Types
Dynamic mapping supports a number of field types, and is reliant on a strong type system.
We have defined 8 primitive types that your custom entity's fields can use.
Examples of each field type
The following snippet shows an example entity with all the fields we support:
{
  "customEntity": {
    "text": "Working on it",
    "numeric": 123,
    "text_array": [
      "1dropdown",
      "2dropdown",
      "3drop"
    ],
    "date": "2020-09-27",
    "text_with_label": {
      "value": "http://www.google.com",
      "label": "Google"
    },
    "people": {
      "identifierType": "email",
      "identifierValue": ["[email protected]", "[email protected]"]
    },
    "boolean": true,
    "date_time": {
      "dateWithTime": "2020-09-27T21:38:00.000Z"
    }
  }
}
Mapping rules for monday.com columns
Below is a list of columns supported by dynamic mapping and their corresponding inbound/outbound types:
| Column Name | Outbound Type | Inbound Type |
|---|---|---|
| Item ID | numeric | |
| Name | text | text, text_array, numeric |
| Text | text | text, text_array, numeric, date, date_time, boolean |
| Long Text | text | text, text_array, numeric, date, date_time, boolean |
| Status | text | text, numeric, boolean |
| People | user_emails | user_emails |
| text | text, text_array | |
| Numbers | numeric | numeric |
| Rating | numeric | numeric |
| Dropdown | text_array | text, text_array, numeric |
| Date | date_time | date, date_time |
| Checkbox | boolean | boolean |
| Link | text_with_label | text, text_with_label |
Tutorials
1. Configure your custom entity
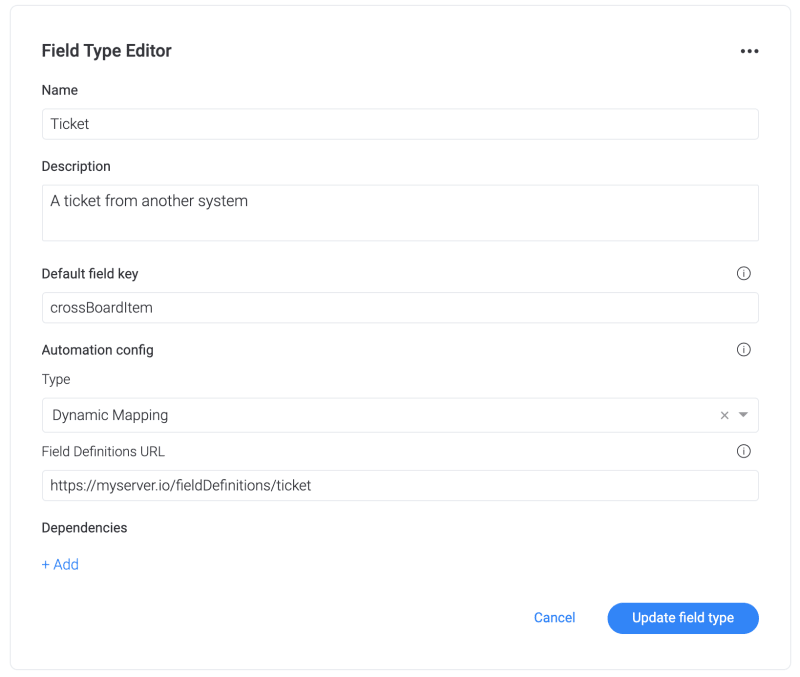
Step 1: Create a custom field
In your integration feature, click the “Field Types” tab and create a new Field Type:

- Configure the basic information of your custom entity.
- In the automation config section, select “Dynamic Mapping".
- In the “Field Definitions URL”, enter your server’s endpoint for getting the field definitions for this entity.
- Enter any dependencies for the entity.
- Press save. Your entity can now be used in your app's recipes!
2. Map data from monday to your app
Outbound mapping is when data from monday.com is mapped to your app. To implement this, you need to use your entity in a custom action, and use a trigger that supports mapping.
A trigger supports mapping if it contains itemValues as one of its output fields. The triggers that currently support mapping are:
- When an item is created
- When a column changes
- When status changes
- When status changes to something
Configure your custom action with your entity as an input field
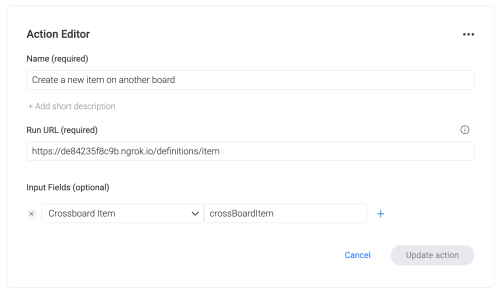
To use outbound mapping, you'll need to create a custom action and include your custom entity as an input field. Here’s what the custom action should look like -- notice the custom entity "Crossboard Item" in the input fields section:
TIPFor a tutorial of building an app with a custom action, check out our Quickstart Guide: Integration Recipes.
Create a new recipe with your custom action
- First, create a new recipe in your integration feature.
- Configure the trigger as normal:

- Add your custom action and map the source entity field. The source entity must come from the trigger output fields and be a mappable itemValues field.
- Specify your dependencies in the action configuration. By default the board ID will always be required, and any additional dependencies will also be listed here.
- By the end of this step, your action will look like this:

Listen for a request to your Run URL
When the action is invoked, the monday Apps server will send the following payload to your Run URL:
{
    "payload" : {
        "inboundFieldValues" : {
            "boardId" : 541329092,
            "crossBoardItem" : {
                "text" : "Hello world",
                "long_text" : "Hello, world?",
                "numbers" : 42,
                "people": { identifierType: "email", identifierValue: ["[email protected]", "[email protected]"] }
              }
          }
         "recipeId": 123456, //unique ID of the recipe for your app. if multiple accounts are using the same recipe, the same recipe ID will be sent
         "integrationId": 123456 //unique ID of the integration recipe added to your board
    }
}
3. Map data from your app into monday.com
Inbound mapping is when your app sends data to monday.com, which is then mapped to an item on a board.
Create a custom trigger with your entity as an output field
To use inbound mapping, you need to create a custom trigger that contains your custom entity as one of its output fields. You should include any dependencies as input fields.
Start by creating a new custom trigger in your integration feature. Include your entity in the output fields, as well as any dependencies it requires from the trigger:


Create a recipe with your custom trigger
Once your trigger is created, you'll need to use it in a recipe.
Add the trigger to your recipe:

If your app uses inbound mapping, you must use the action "Create an item in board". This action will create a new item on a board with the entity's data mapped to columns.
Add the "Create an item in board" action
Configure the itemMapping field as follows:
- Source Entity: your custom entity, which should be in the output fields of the trigger
- Dependency Fields: the board whose columns will be mapped
This is what your action configuration should look after this step:

Call your trigger
After a user subscribes to your trigger, you can send your entity's data to the webhook URL. This data will then be mapped to the new item in monday.com.
This is what your webhook output should look like:
{
  "trigger": {
    "outputFields": { ///values of all output fields, which were configured for your custom trigger
      "myEntity": {
        "field1" : "Hello world!",
        "field2" : "This is another field"
      }
    }
  }
}